How to Setup the Asus RT-AX53U AX1800 dual band Wifi 6 Router?
Asus is known worldwide for its gaming niche-related routers and other devices. However, even with the most efficient hardware, there are always issues that can occur and slow down your ability to achieve seamless productivity. It is crucial to learn how to set up your new Asus RT-AX53U setup. And, it is important to know the details of your router.asus.com web address so you can easily set up a network connection.
Asus RT-AX53U Router Login
You will need to connect your smartphone/computer to the Asus router network to access the Asus RT-AX53U login page. The login page uses the local server. It is therefore important to connect your computer to the network. Here are some steps you can follow to access the login page.
- An Ethernet cable can be used to connect your Asus RT-AX53U setup with the MODEM. The cable should be plugged in one end to the router’s LAN port and the other into the MODEM’s LAN port.
- The power adapter and power cords should be connected to the power outlet. Turn on the power supply, and wait for your router to return to normal operation.
- Once the power LED turns solid on your device, you can go to the section “Networks and Internet” on the computer/wireless setting on your smartphone. From the list of available networks, look for the Asus router SSID. Click on the “Connect” button and select the name.
Now you will see a prompt on the computer with a message indicating that your connection was successful.
- Open the web browser on your connected device. Use the web address “https://www.router.asus.com” in the address bar and press Enter. Alternatively, you can also type “https://192.168.0.1” to get to the login page.
- Once you hit Enter, you’ll be taken to the Asus router login page. Here you can enter your default login credentials, such as the username and password, to access the setup wizard.
Once you have logged into the Asus RT-AX53U setup wizard you can follow the on-screen steps for configuring the network settings.
Troubleshooting Asus RT-AX53U setup issues
- Verify that you have the correct IP/web address. It is possible to make a mistake when typing addresses. Check the web address you are using for correctness. Always use https://www.router.asus.com or the IP address https://192.168.0.1. Make sure to use the address bar for entering the same, not the search bar.
- Make sure your router network is active on the computer/smartphone you’re trying to access the login page from. Connect to the network by following the instructions in the previous section. If you wish, an Ethernet cable can be used to connect your router and computer. This will make it much easier to connect to your Asus RT-AX53U setup network via an ethernet cable. Double-check that you are connecting to the right device network, especially if there are multiple routers installed at your house/office.
- You will need to reset your router device if you forget the login details for the router setup wizard. To factory reset the device, press the RESET button located on the rear/side panels and hold it down until all the LEDs flash. After the router has powered on, you can then go through the same login procedure as in the previous section. Now you can use default login credentials.
Upgrading your Asus Router Firmware
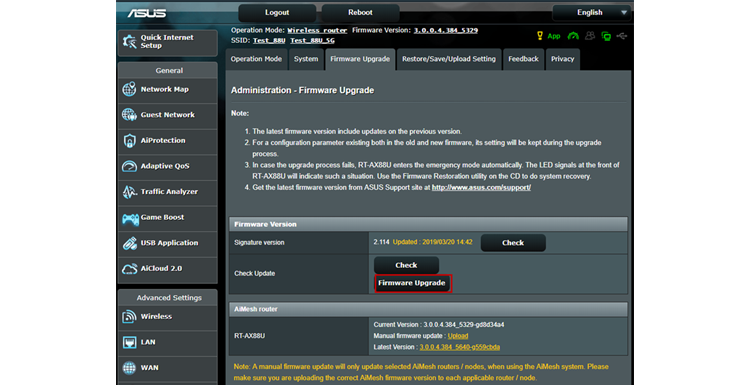
You should immediately process any pending Asus RT-AX53U firmware update. These are the steps to follow:
- Navigate to the Asus Download Center using a web browser. You can use the https://www.asus.com/in/support/Download-Center/ web address.
- Once the page opens, choose the router model you wish to use or enter the model number in this field.
- The router image will appear to the right. Click on the Drivers and Tools button next to the image.
- The product page will now open. Scroll down to see the BIOS and Firmware button. Click on the Download button to save the firmware file on your system.
- Use the web address router.asus.com to open the web browser.
- Click on Firmware Update in the Device Administration section.
- In one of the sections, you will see the Upload button. Click the Next button. This will open a new window where you can select the firmware file you just downloaded.
- Click on the button to Update Firmware and select the file.
Your Asus RT-AX53U firmware update will be processed now.